| 일 | 월 | 화 | 수 | 목 | 금 | 토 |
|---|---|---|---|---|---|---|
| 1 | 2 | 3 | 4 | 5 | ||
| 6 | 7 | 8 | 9 | 10 | 11 | 12 |
| 13 | 14 | 15 | 16 | 17 | 18 | 19 |
| 20 | 21 | 22 | 23 | 24 | 25 | 26 |
| 27 | 28 | 29 | 30 |
- 기초확률론
- cs231n
- vscode
- AIFFEL
- 도커
- Pull Request
- ssh
- 오블완
- Jupyter notebook
- 히비스서커스
- Multi-Resolution Networks for Semantic Segmentation in Whole Slide Images
- 사회조사분석사2급
- 프로그래머스
- 코크리
- cocre
- 백신후원
- aiffel exploration
- IVI
- docker
- airflow
- Decision Boundary
- HookNet
- GIT
- logistic regression
- docker attach
- 티스토리챌린지
- numpy
- docker exec
- WSSS
- CellPin
- Today
- Total
히비스서커스의 블로그
[mmdetection] mmdetection을 통한 object detection 데이터셋 커스터마이징 방법 (ver.3.1) 본문
[mmdetection] mmdetection을 통한 object detection 데이터셋 커스터마이징 방법 (ver.3.1)
HibisCircus 2023. 7. 25. 17:25이번 글에서는 object detection 모델 학습을 위한 라이브러리로 유명한 mmdetection을 사용하기 위한 방법을 다루고자 한다. 기존 버전들(ver 2.x)에 대한 블로그 글은 많지만 최근 ver 3.x로 업데이트 된 후 정리된 내용이 없어 직접 사용해본 후 정리해보았다.

0. 설치 및 설정
mmdetection은 라이브러리 설치 후 모듈을 불러오는 일반적인 방식과 다르게 git clone 후 커스터마이징하는 방식으로 많이 쓴다.
먼저, mmdetection은 mmengine과 mmcv라는 라이브러리와 연동되어 작용하기 때문에 이들을 먼저 설치해주어야 한다.
pip install -U openmim
mim install mmengine
mim install "mmcv>=2.0.0"
그 후, mmdetection의 코드를 git clone 한 후 설정 파일들을 설치해준다.
git clone https://github.com/open-mmlab/mmdetection.git
python mmdetection/setup.py install
1. 디렉토리 구조 파악
mmdetection의 디렉토리 구조가 복잡하기에 전체 구조를 먼저 파악할 필요가 있다.
주목해야 할 디렉토리는 configs와 mmdet이다.
2. configs 파악하기
먼저, configs 안의 구조를 살펴보면 아래와 같다.
_base_ 디렉토리와 이외 albu_example 부터 사진 안에는 안 담겨진 yolox까지의 디렉토리가 존재한다.
먼저 configs 디렉토리 아래에 나만의 디렉토리(a_my_config)를 하나 만든 후 파일(my_config.py)을 생성하여 아래의 예시와 같이 _base_에서 생성할 파일들의 경로를 넣어준다.

_base_ 디렉토리는 학습에 사용할 데이터셋과 모델 및 스케줄링을 설정하는 디렉토리이다. datasets, models, schedules 디렉토리에 파일을 생성한다.
이번 글에서는 새로운 데이터셋에 커스터마이징하는 방법을 알아볼 것이기 때문에 dataset 부분만 집중해서 살펴본다. (나머지는 models와 schedule을 설정하는 글들은 많은 블로그에서 다루고 있으니 쉽게 찾을 수 있다. 잊지 말고 꼭 수정해야 할 것은 models에서 class의 수를 수정해주어야 한다는 것이다.) 대표적인 mmdetection/configs/_base_/datasets/coco_detection.py를 복사해서 커스터마이징하는 것이 편하다.
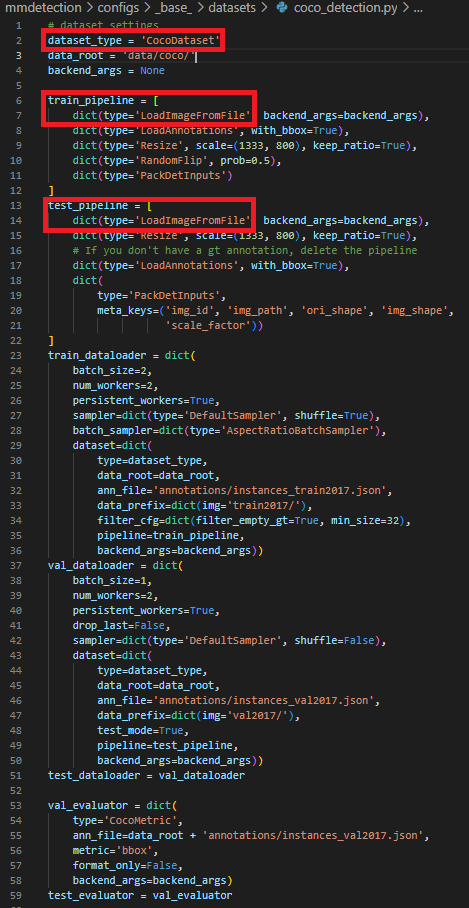
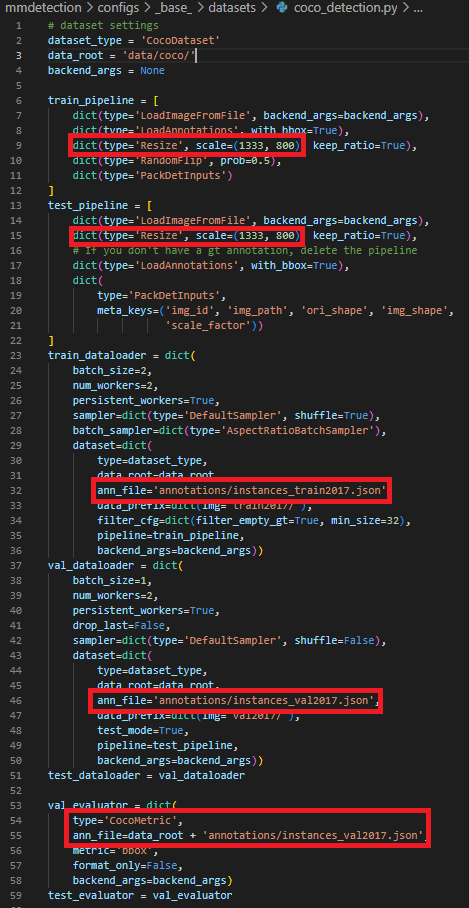
내용을 살펴보면 수정해야할 내용들이 많지만 파일들을 새로 생성해야 하는 부분들에 대해서만 빨간색 표시를 해주었다. dataset_type에 들어갈 내용(CocoDatasets)과 pipline에 들어갈 내용 (LoadImageFromFIle) 은 위에서 언급한 mmdet 디렉토리 안에서 생성하여 설정해주어야 하는 부분들이다.
이들의 역할에 대한 간략한 설명을 하자면 아래와 같다.
dataset_type에 들어갈 내용 :: class, annotation 경로, bbox의 가로,세로, 크기 등을 설정 (torch.utils.data.Dataset설정과 유사)
pipline에 들어갈 내용 :: 데이터를 읽은 뒤 이미지 처리를 어떻게 할 것인지 처리 (필자의 경우 Whole slide Image를 읽은 후 일부 이미지만 사용했기에 따로 생성)
이외에 data_root, resize의 scale, anno_file의 경로 및 evaluator에 들어갈 내용은 마지막에 따로 정리하였다!
3. mmdet 파악하기
mmdet 디렉토리의 구조를 살펴보면 아래와 같다.
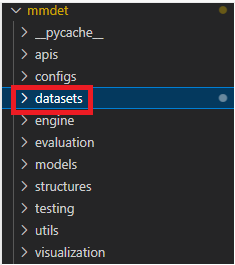
역시나 복잡한 구조이나 주목해야할 것은 datasets 디렉토리이다. datasets 디렉토리안에서 dataset_type과 pipline에 들어갈 내용들을 생성할 수 있다.
3-1) dataset_type을 위한 설정
dataset_type 설정을 위해 살펴봐야할 내용은 아래와 같다.
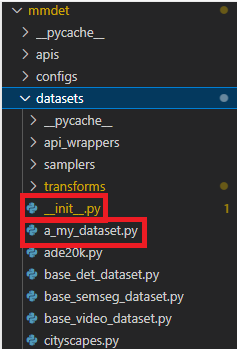
datasets 디렉토리 안에 여러 파일들이 존재하는데 만약 xml로 읽어들일 경우 mmdetection/mmdet/datasets/wider_face.py 의 파일을 복사한 후 원하는 파일명으로 변경 후 커스터마이징을 한다. 예시는 아래와 같으며 파일명은 a_my_dataset.py로 하였다.
from mmengine.dist import is_main_process
from mmengine.fileio import get_local_path, list_from_file
from mmengine.utils import ProgressBar

from mmdet.registry import DATASETS
from mmdet.utils.typing_utils import List, Union
from .xml_style import XMLDataset

import os.path as osp
import xml.etree.ElementTree as ET

import numpy as np
from PIL import Image


@DATASETS.register_module()
class MyDataset(XMLDataset):

    METAINFO = {'classes': ('class_object_to_find', )}

    def load_data_list(self) -> List[dict]:
        """Load annotation from XML style ann_file.

        Returns:
            list[dict]: Annotation info from XML file.
        """
        assert self._metainfo.get('classes', None) is not None, \
            'classes in `XMLDataset` can not be None.'
        self.cat2label = {
            cat: i
            for i, cat in enumerate(self._metainfo['classes'])
        }

        data_list = []
        img_ids = list_from_file(self.ann_file, backend_args=self.backend_args)

        # loading process takes around 10 mins
        if is_main_process():
            prog_bar = ProgressBar(len(img_ids))

        for img_id in img_ids:
            raw_img_info = {}
            raw_img_info['img_id'] = img_id
            raw_img_info['file_name'] = f'{img_id}.jpg'
            parsed_data_info = self.parse_data_info(raw_img_info)
            data_list.append(parsed_data_info)

            if is_main_process():
                prog_bar.update()
        return data_list

    def parse_data_info(self, img_info: dict) -> Union[dict, List[dict]]:
        data_info = {}
        img_id = img_info['img_id']
        xml_path = osp.join(self.data_prefix['img'], 'middle_directory', # image_path/middle_directory/annotation_files ... 와 같은 경우 입력
                            f'{img_id}.xml')
        data_info['img_id'] = img_id
        data_info['xml_path'] = xml_path

        # deal with xml file
        with get_local_path(
                xml_path, backend_args=self.backend_args) as local_path:
            raw_ann_info = ET.parse(local_path)
        root = raw_ann_info.getroot()
        width = 0
        height = 0
        size = root.find('size')
        img_path = osp.join(self.data_prefix['img'],
                            img_info['file_name'])
        if size is not None:
            width = int(size.find('width').text)
            height = int(size.find('height').text)
        else:
            img = Image.open(img_path)
            width, height = img.size
        data_info['img_path'] = img_path

        data_info['height'] = height
        data_info['width'] = width

        # Coordinates are in range [0, width - 1 or height - 1]
        data_info['instances'] = self._parse_instance_info(
            raw_ann_info, minus_one=False)
return data_infoXMLDataset을 오버라이딩 해준 후 생성해주어야 하는 메서드는 load_list와 parse_data_info이다.
load_list에는 각 이미지의 id와 파일명을 딕셔너리 형태로하여 리스트로 담아서 리턴하게 한다.
parse_data_info에서는 load_list의 내용을 받아 딕셔너리에 object detection에 필요한 size, width, height등을 추가하여 리턴한다.
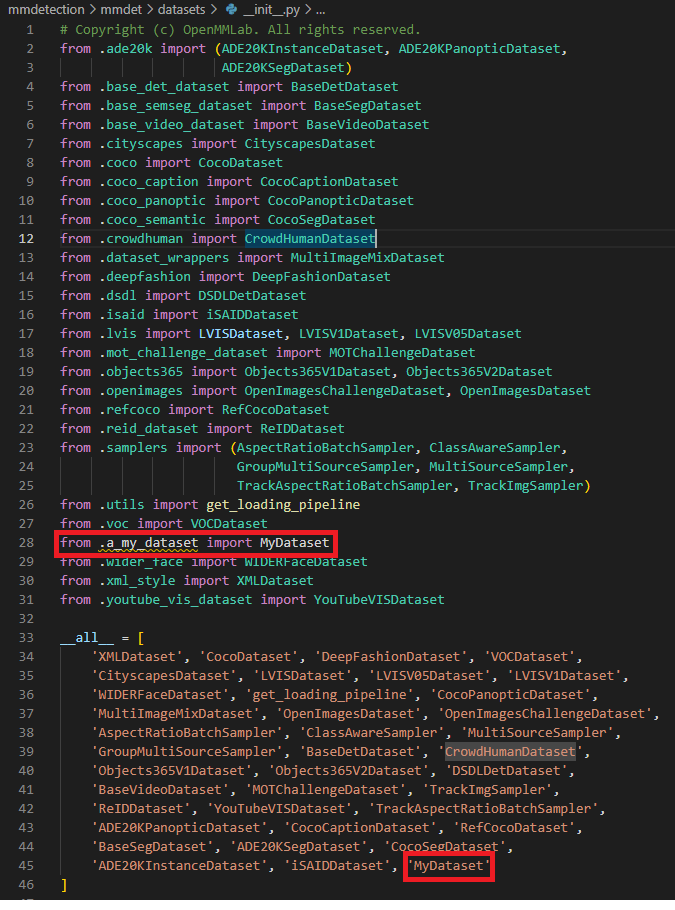
기존의 파일들을 잘 찾아보면서 자신이 사용할 방법과 유사한 것을 찾았다면 수정할 것은 METAINFO의 class 부분 말고는 거의 없을 것이다. 이제 __init__.py에 파일에서 불러들인 후 모듈로 사용할 수 있도록 해준다.
3-2) pipeline을 위한 설정
다음으로, pipeline에 들어갈 내용을 만들기 위해 살펴봐야할 파일들은
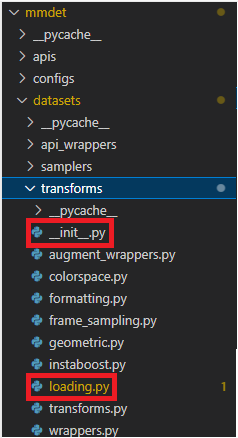
transforms 디렉토리의 __init__.py와 loading.py이다.
먼저, loading.py 파일 안에 아래의 예시와 같이 BaseTransform을 오버라이딩한 class를 만들어준다.
@TRANSFORMS.register_module()
class MyFileLoader(BaseTransform):
def __init__(self,
to_float32: bool = False,
color_type: str = 'color',
imdecode_backend: str = 'cv2',
file_client_args: Optional[dict] = None,
ignore_empty: bool = False,
*,
backend_args: Optional[dict] = None) -> None:
self.ignore_empty = ignore_empty
self.to_float32 = to_float32
self.color_type = color_type
self.imdecode_backend = imdecode_backend
self.img_size = (512, 512)
self.file_client_args: Optional[dict] = None
self.backend_args: Optional[dict] = None
if file_client_args is not None:
warnings.warn(
'"file_client_args" will be deprecated in future. '
'Please use "backend_args" instead', DeprecationWarning)
if backend_args is not None:
raise ValueError(
'"file_client_args" and "backend_args" cannot be set '
'at the same time.')
self.file_client_args = file_client_args.copy()
if backend_args is not None:
self.backend_args = backend_args.copy()
def transform(self, results: dict) -> Optional[dict]:
"""Functions to load image.
Args:
results (dict): Result dict from
:class:`mmengine.dataset.BaseDataset`.
Returns:
dict: The dict contains loaded image and meta information.
"""
filename = results['img_path']
try:
#################################################################################
########################## 원하는 이미지 처리 코드 입력 ##########################
#################################################################################
except Exception as e:
if self.ignore_empty:
return None
else:
raise e
if self.to_float32:
img = img.astype(np.float32)
results['img'] = img
results['img_shape'] = img.shape[:2]
results['ori_shape'] = img.shape[:2]
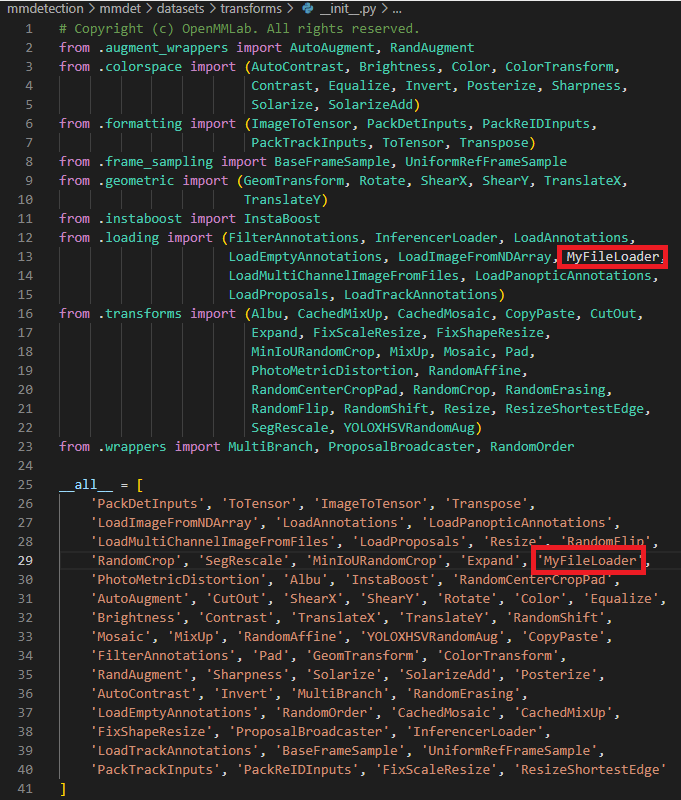
return results주석처리로 원하는 이미지 처리 코드 입력 부분에 file_name에 이미지 경로가 있으므로 처리할 코드를 입력해준다. 이후, __init__.py 파일 안에 생성한 class를 입력하여 모듈로 사용할 수 있도록 해준다.
4. 이외의 설정
다시 configs/_base_./datasets으로 돌아와 나머지 설정을 해보면
주의해야할 부분은 resize와 ann_file, evaluator부분으로 크게 3가지 이다.
4-1) Resize 부분
resize 부분에서는 데이터 크기에 맞게 다시 설정해주는 것이 중요하다.
4-2) ann_file 부분
ann_file 부분은 coco_metrics의 경우와 같이 json 파일이 annotation내용을 전부 담고 있는 경우에 json파일로 설정이 가능하지만 annotation 파일을 데이터당 개별 파일로 가지고 있는 경우에는 train.txt, valid.txt, test.txt와 같은 텍스트 파일을 생성한 후 데이터를 train, valid, test로 나누었을 시 포함되는 annotation파일들의 목록들을 포함해주면 된다.
4-3) evaluation 부분
evaluation 부분은 annotation의 타입에 따라 CocoMetric이나 VOCMetric으로 설정해주면 된다. 만약, VOCMetric을 사용해야 하는 경우 evaluation 설정 예시는 아래와 같다.
val_evaluator = dict(
    type='VOCMetric',
    metric='mAP',
    eval_mode='11points')
test_evaluator = val_evaluator
5. 학습 명령어
위와 같이 본인이 가지고 있는 데이터셋에 맞게 코드들을 잘 커스터마이징 해주었다면 아래의 명령어를 통해 mmdetection으로 object detection model을 학습시킬 수 있다.
python tools/train.py configs/a_my_config/my_config.py --work-dir checkpoints/my_config_checkpoints
마치며
이 글을 읽고 코드들을 수정하며 사용하였을 경우에도 많은 에러들이 발생할 수 있겠지만 이 글의 목적은 mmdetection의 커스터마이징 방법을 전반적으로 훑어보는 차원에서 쓴 것이므로 양해를 구한다.


